
Complete Guide to Using Two-Way Radios

Mobile Radio Handsets: When using an in-vehicle handset, hold the microphone steady without turning away while speaking, and minimize cab/background noise before transmitting.Maintain Correct Distance: Hold the microphone approximately 2 to 3 inches from your mouth and speak across it at a normal volume rather than directly into it. Radios equipped with high audio gain can remain clipped to a lapel or vest up to 12 inches away.Keep It Upright: Position the radio vertically with the antenna pointing up to optimize RF signal range and reception.To use a two-way radio, turn it on, check the battery, set the volume, select the correct channel or talk group, listen before speaking, press and hold the push-to-talk button, pause briefly, speak clearly, release the button, and wait for a response. Two-way radios work best when users keep messages short, identify themselves clearly, confirm important instructions, and follow the same communication procedures.
Two-way radios are practical communication tools for businesses that need fast, reliable, team-based voice communication. Unlike phone calls, which are usually one-to-one, two-way radios are designed for quick push-to-talk conversations with the people who need to hear the message. That makes them useful for coordinating supervisors, drivers, technicians, facilities teams, operations teams, security teams, hospitality staff, schools, construction crews, warehouses, manufacturing sites, and other commercial workgroups.
To get the most value from two-way radios, users need to understand how to operate them correctly, speak clearly, choose the right channel or talk group, and maintain the equipment properly.
This guide explains how two-way radios work, how push-to-talk communication works, what channels and zones are, how to speak clearly over the radio, how to use common radio terminology, and how to care for, clean, store, charge, and maintain radios.
Two-way radios are simple to use, but they work best when every user follows the same procedures. A few minutes of training can help reduce missed messages, blocked channels, unclear instructions, and unnecessary wear on the equipment.
What is a Two-Way Radio?
A two-way radio is a communication device that can both transmit and receive voice messages. Most two-way radios use a push-to-talk button, often called PTT. When the user presses and holds the PTT button, the radio transmits their voice. When the user releases the button, the radio returns to listening mode.
Two-way radios are commonly used when teams need short, fast, and coordinated communication. A team member can speak to a group without dialing a number, waiting for someone to answer, or starting a separate phone call. The user presses PTT, speaks clearly, releases PTT, and waits for a reply.
For business users, two-way radios are often part of a larger communication plan. A facility may use radios for operations, maintenance, logistics, reception, supervision, transportation, guest services, or shift coordination. A fleet may use mobile radios to coordinate drivers and dispatchers. A multi-site business may use a radio system, dispatch application, or Push-to-Talk over Cellular platform to organize teams across locations.
The most important point for new users is simple: a two-way radio is not just another voice device. It is a shared communication tool. Every person on the system needs to know when to speak, when to listen, what group to use, and how to keep messages short enough that other users can communicate.
How Do Two-Way Radios Work?
Two-way radios work by sending voice communication from one radio user to another user or group of users. Depending on the system, the communication path may use radio frequencies, repeaters, a digital radio system, cellular broadband, Wi-Fi, or a dispatching platform. The user experience, however, is usually the same: press the Push-to-Talk (PTT) button to speak and release the PTT to listen.
A basic two-way radio workflow looks like this:
- Turn the radio on.
- Confirm that the battery has enough charge for the shift.
- Set the volume high enough for the work environment.
- Select the correct channel, group, or zone.
- Listen before speaking.
- Press and hold the PTT button.
- Pause briefly before talking so the beginning of the message is not clipped.
- Speak clearly at a normal pace.
- Release the PTT button when finished.
- Listen for a confirmation or a reply.
That process may sound simple, but it is the foundation of effective radio communication. Many radio problems are not caused by the equipment. They are caused by poor habits: speaking too quickly, holding the radio too close, talking over another user, staying on PTT too long, using the wrong channel, or transmitting a message before deciding what needs to be said.
How To Use Two-Way Radios
How Do You Use Two-Way Radio Buttons and Basic Features?
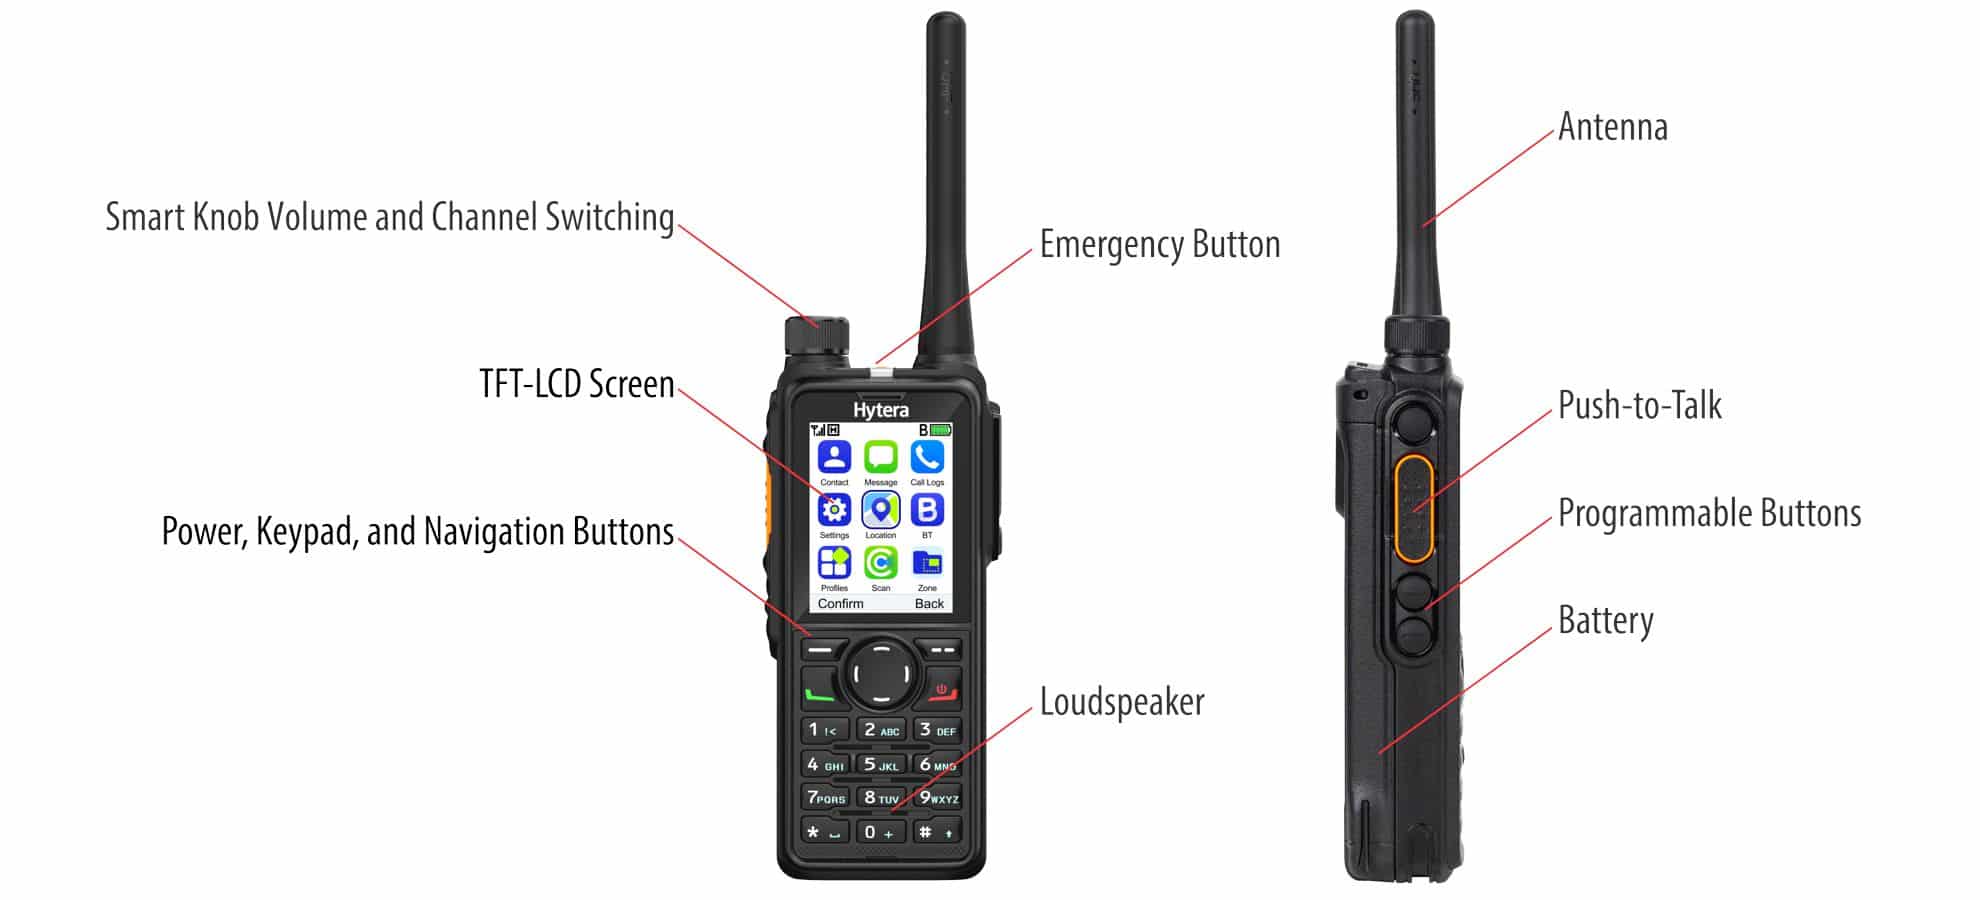
Radio models vary, but most business users need to understand a consistent set of controls.
The Power button turns the radio on.
The PTT button is the primary communication control. It is usually located on the side of a handheld radio and is designed to be easy to press while gripping the radio. Users should press and hold the PTT button, pause briefly, speak, and then release the button so others can respond.
The Volume Control button adjusts the audio level. Users should set the volume before starting work and confirm they can hear calls in the actual work environment. A volume setting that works in a quiet office may be too low in a warehouse, loading area, vehicle, or outdoor location.
The Channel knob allows the user to choose a programmed communication path. In many organizations, channels are assigned by department, work area, job function, or site. Users should know which channel or group is correct for normal communication, and which channels are reserved for supervisors, operations, facilities, transportation, or other internal teams. Smart knobs combine functions like volume and channel selection. Turn the knob to change the volume and press down and turn the knob to change channels.
The Keypad and Navigation buttons allow users to access menus, contacts, messages, status options, or settings, depending on the radio model and configuration. Not every organization enables every feature. Training should focus on which features the user will actually need during a workday.
The Programmable buttons can be configured for shortcuts, depending on the radio model and system design. Common examples may include scan, monitor, zone selection, call functions, or other assigned features.
The Emergency Call Button is an orange or red button on the top of the radio that makes a specific type of call in an emergency. It can be programmed to automatically initiate an All Call broadcast, place a call to a predefined talk group, sound an emergency alarm tone, or transmit GPS location data.
Accessory connector ports allow connectivity of handheld speaker microphones, earpieces, headsets, and other approved accessories. Only use accessories that are approved for the radio model and the organization’s use case.
What is the Difference Between Half-duplex and Full-duplex Calls?
Most two-way radio conversations are half-duplex. Half-duplex means that communication happens in one direction at a time. A user can speak, or a user can listen, but the same user generally cannot do both at the same time on the same conversation path. This is required for group calls based on channel capacity and prevents everyone on a group call from interrupting each other.
This is why PTT discipline matters. When a user presses and holds the PTT button, they are occupying the channel or talk path. Other users must wait until that person releases PTT before they can reply. If two users try to transmit at the same time, one message may block the other, or the conversation may become unclear.
Half-duplex communication works well when teams follow simple protocols:
- Listen before speaking.
- Keep messages short.
- Use “over” when a reply is expected.
- Release PTT immediately after speaking.
- Wait for the other user to finish before responding.
- Break long instructions into shorter messages.
Some communication systems or devices may support full-duplex communication in specific contexts, which allows simultaneous talking and listening, more like a phone call. Some radios support full-duplex individual (one to one) calls, but not on group calls.
For training purposes, most daily radio conversations require turn-taking. This habit will help users communicate clearly and avoid blocking one another.
What Are Channels and Zones in Two-Way Radio Systems?
In a professional two-way radio system, channels and zones work together to organize who talks to whom and how quickly users can reach the right group.
A channel works like a preset button on a car radio. Just as a preset is pre-tuned to a specific station, hiding all the technical details behind a single button press, a channel on a two-way radio is a pre-configured communication path stored in your radio by a technician. It may have a simple, descriptive name like “Supervisors” or “Administration”. All the technical settings such as frequency, power level, and privacy settings needed to reach the right people are already built into the handheld behind the scenes. Users simply select the channel by name and they’re ready to communicate. No tuning, no configuration; just select and talk. Channels can also support different types of calls, including group calls, individual calls, and broadcast calls (to all users, also referred to as an All Call).
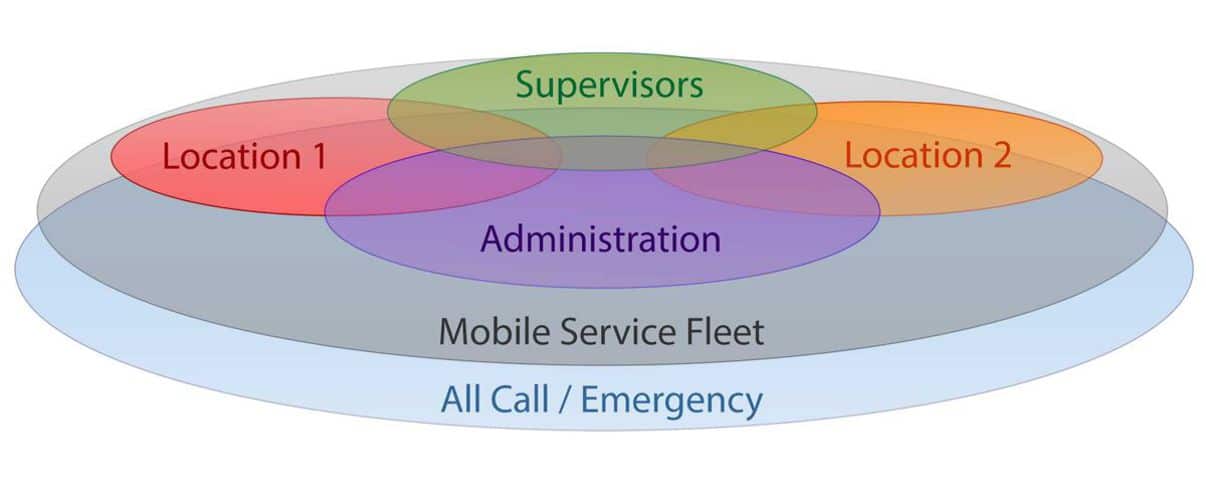
This diagram shows how channels can be organized as talk groups. Talk groups can be organized around job titles, work locations, or an emergency call group that broadcasts to all users. Also note that users can belong to multiple talk groups as shown in the overlapping areas.
A zone is a way to organize channels or groups inside a radio. Zones are used like folders in the radio screen interface to organize many talk groups. Zones are useful when a business has multiple departments, buildings, locations, shifts, or repeater sites. A radio may be programmed so users can select a zone first, then select the channel or group inside that zone. This keeps large radio systems easier to navigate.
Planning and using channels and zones is important to avoid miscommunication, confusion, and unwanted call traffic. Users may call the wrong team, miss important updates, or broadcast routine messages to too many people. That creates noise, slows operations, and reduces confidence in the radio system.
How to Talk on a Two-Way Radio
How Do You Hold and Speak Into a Two-Way Radio?
Clear voice transmission relies on proper handling, disciplined Push-to-Talk (PTT) timing, and standard operational protocols. Use the following guidelines to ensure your messages are heard and understood across your team.
How to Hold a Two-Way Radio When Speaking
Properly holding the two-way radio is crucial for clear communication. Follow these steps:
- Grip Firmly: Hold the radio securely in one hand. Do not cover the microphone port with your fingers, swing the device, or hold it by the antenna.
- Keep it Upright: Position the radio vertically with the antenna pointing up to optimize RF signal range and reception.
- Maintain Correct Distance: Hold the microphone approximately 2 to 3 inches from your mouth and speak across it at a normal volume rather than directly into it. Radios equipped with high audio gain can remain clipped to a lapel or vest up to 12 inches away.
- Mobile Radio Handsets: When using an in-vehicle handset, hold the microphone steady without turning away while speaking, and minimize cab/background noise before transmitting.
How to Use the Push-to-Talk (PTT) Button When Speaking
The PTT button is a key feature of two-way radios, allowing you to transmit your voice. Here’s how to use it:
- Locate the PTT Button – Usually on the side of the radio, it’s often the largest button for easy access.
- Press and Hold – Firmly press and hold the PTT button to begin transmitting. Ensure you hold it for a brief moment before speaking to avoid cutting off the start of your message.
- Speak Clearly – While holding the PTT button, speak clearly and at a normal volume. Over-enunciating or shouting can distort your message.
- Release to Listen – After speaking, release the PTT button to allow others to respond. Remember, holding the button continuously will block others from transmitting.
What Are the Best Practices for Two-Way Radio Communication?
Good radio communication should be fast, clear, and easy to understand. Two-way radios are built for quick coordination, not long conversations. They work best for instructions, status updates, alerts, handoffs, and confirmations.
A simple radio message should identify who you are calling, identify who is speaking, state the message, and confirm whether a response is needed.
Example:
“Maintenance, this is Shipping. Dock door three is ready for pickup. Do you copy? Over.”
To keep radio traffic efficient, train employees to follow the 5 Cs of clear radio communication:
Concise – Keep messages short and focused. Say what matters, avoid unnecessary detail, and release the channel so others can communicate.
Clear – Use plain language, standard terms, and a steady pace. Avoid slang, unclear shortcuts, or overly technical language unless everyone on the channel understands it.
Confident – Speak in a calm, controlled voice. Do not shout into the microphone, and do not speak so quickly that the message becomes difficult to understand.
Controlled – Listen before speaking, use the correct channel or talk group, and avoid talking over other users. Channel discipline helps prevent missed messages and confusion.
Capable – When accuracy matters, ask for confirmation. Phrases such as “Do you copy?” or “Say again” help ensure that instructions, locations, schedules, and handoffs are understood.
Clear communication depends on both the radio system and the people using it. With the right equipment, consistent procedures, and basic user training, teams can communicate faster, reduce confusion, and stay coordinated throughout the workday.
Do Not Transmit Sensitive Information
Do not assume radio conversations are private. Users should avoid transmitting confidential business information, personal information, customer details, payment information, medical information, credentials, or sensitive internal issues over a shared radio channel.
Perform Regular Radio Checks
What is a radio check? A radio check is a quick test to confirm the radio is powered on, set to the correct channel or group, has sufficient battery, and is transmitting clearly.
Before going on duty, ensure your radio battery is charged and power is on
To perform a radio check, listen for traffic, press PTT, and state: “Radio check. This is [name or role]. Over.” Wait for a response like, “Read you loud and clear.”
Documentation and Training
A business should document its radio naming convention and train employees to use it consistently. This is especially important for shift changes, shared radios, temporary staff, new employees, and large facilities.
What is Two-Way Radio Lingo and Terminology?
Radio terminology can help teams communicate efficiently, but it only works when everyone understands the same terms. For most commercial environments, plain language is often the clearest choice. Standard radio terms can still be useful, especially for confirming messages, asking for repeats, and ending transmissions.
A Quick-Reference Guide to Radio Terminology
Two-way radio lingo is the set of standard words and phrases radio users use to communicate clearly and efficiently. Terms such as “copy,” “roger,” “stand by,” “say again,” “over,” and “out” help teams confirm instructions, request clarification, identify when a message is complete, and reduce confusion during fast-moving operations. For best results, organizations should document approved radio terms and train employees to use them the same way.
| Term | Meaning & Definition | Proper Usage Example |
|---|---|---|
| Radio Check | “How is my signal strength and clarity?” | “Dispatch, this is Unit 1, can I get a radio check?” |
| Loud and Clear | Signal is strong and the audio is easy to understand. | “Unit 1, I read you loud and clear.” |
| Roger | “I have received and understood your transmission.” | “Roger that, heading to Site B now.” |
| Wilco | Short for “Will comply.” I understand and will follow instructions. | “Roger, Wilco. Initiating shutdown.” |
| Copy | Used to acknowledge receipt of specific data or information. | “Copy that, I have the room number.” |
| Affirmative / Negative | Professional replacements for “Yes” and “No.” | “Affirmative, the gate is secured.” |
| Say Again | “Please repeat your last transmission.” | “Say again, signal was interrupted.” |
| Over | “I have finished speaking and am waiting for a response.” | “Arriving at the loading dock, over.” |
| Out | “The conversation is ended; I am signing off.” | “Copy that. Unit 4, out.” |
| Stand By | “I have received your call but am busy; please wait.” | “Unit 2, stand by for location data.” |
| Break, Break | Signal used to interrupt a busy channel for an emergency. | “Break-break, we have a medical emergency.” |
Avoid mixing too many codes, shortcuts, and local phrases unless they are documented. New employees, temporary employees, contractors, and cross-functional teams may not understand informal terms.
What is the Phonetic Alphabet?
The phonetic alphabet helps users spell words clearly over voice communication. It is especially useful for names, addresses, product codes, room numbers, dock doors, vehicle identifiers, job numbers, and words that sound alike.
Use the phonetic alphabet when a misunderstood letter could cause confusion. For example, “B” and “D” can sound similar over a noisy channel. Saying “Bravo” and “Delta” makes the message clearer.
Example: “The job code is B-D-7. I spell: Bravo, Delta, seven.”
| Letters | Phonetic | Letters | Phonetic |
|---|---|---|---|
| A | Alpha | N | November |
| B | Bravo | O | Oscar |
| C | Charlie | P | Papa |
| D | Delta | Q | Quebec |
| E | Echo | R | Romeo |
| F | Foxtrot | S | Sierra |
| G | Golf | T | Tango |
| H | Hotel | U | Uniform |
| I | India | V | Victor |
| J | Juliet | W | Whiskey |
| K | Kilo | X | X-ray |
| L | Lima | Y | Yankee |
| M | Mike | Z | Zulu |
The phonetic alphabet is used to reduce confusion when visual cues are unavailable and when words sound alike, such as “site” and “sight” or “way” and “weigh.”
What Are the Two-Way Radio 10-Codes?
Some industries have historically used 10-codes, such as “10-4,” to shorten radio communication. 10-codes originated as brevity codes, but many industries have developed their own shorthand.
For commercial business communication, 10-codes should be used carefully. They can be efficient when everyone is trained, but they can also create confusion when employees come from different backgrounds or locations. A code that means one thing in one workplace may mean something different somewhere else.
For most business teams, plain-language phrases are easier to train and safer for cross-team communication:
- Instead of “10-4,” say “copy” or “message received.”
- Instead of “10-9,” say “say again.”
- Instead of “10-20,” say “what is your location?”
- Instead of “10-7,” say “out of service” or “off duty,” if those terms match company policy.
If your organization uses 10-codes, document the approved list, train every user, and avoid adding informal codes that are not part of the standard.
How To Take Care of Two-Way Radios
How Do You Properly Maintain and Take Care of Two-Way Radios?
Two-way radios are work tools, and they should be maintained and handled accordingly. Even durable radios can be damaged by careless handling, poor storage, incompatible accessories, chemical exposure, moisture, or battery neglect.
Train employees to use, store, and inspect radios properly. Users should not carry radios by the antenna, throw radios, expose radios to harsh chemicals, use unapproved accessories, leave radios in hot vehicles, or expose radios to moisture unless the specific model is rated for that environment.
Basic care guidance includes:
- Do not carry the radio by the antenna.
- Do not throw, drop, or intentionally mishandle the radio.
- Keep the microphone and speaker area clear.
- Keep accessory ports clean and protected when not in use.
- Avoid harsh chemicals, solvents, and unapproved cleaning sprays.
- Keep radios dry unless the specific model is rated for exposure to water.
- Avoid leaving radios in direct sunlight or hot vehicles.
- Inspect radios for visible damage before assigning them to users.
- Remove damaged radios from service and follow internal support procedures.
What is the Best Way to Store Two-Way Radios?
Store two-way radios in a clean, dry location at room temperature when practical. Avoid direct sunlight, moisture, excessive heat, extreme cold, and areas where radios could be dropped, bumped, or knocked off shelves.
For shared-radio environments, assign each radio a storage location. Labeled slots, bins, shelves, lockers, or multi-unit charging stations help employees return radios consistently, reduce lost equipment, and keep devices ready for the next shift.
Two-way radios should be turned off before storage. Radios should also be turned off before being placed in a charger unless the manufacturer’s instructions for that specific model say otherwise.
Recommended storage practices include:
- Turn radios off before storage.
- Store radios at room temperature when practical.
- Avoid direct sunlight, damp areas, and extreme temperatures.
- Store radios where they will not be knocked to the floor.
- Keep radios away from solvents, dust, and unnecessary moisture.
- Use labeled slots, bins, lockers, or charging locations for shared radios.
- Follow manufacturer guidance for battery removal during longer-term storage.
For multi-shift teams, create a check-in and check-out process so radios are assigned, returned, inspected, and charged according to a standard routine. This helps reduce lost radios, dead batteries, and confusion about which device belongs to which team.
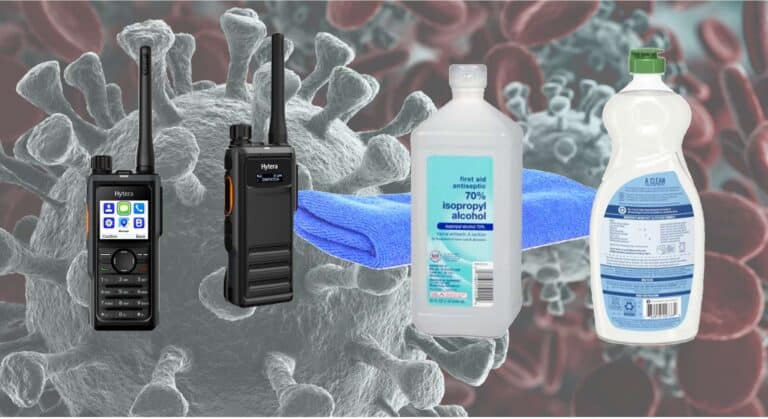
How Do You Clean and Disinfect Two-Way Radios?
Shared radios should be cleaned regularly, especially when multiple users handle the same device. Cleaning removes visible dirt, dust, oils, and debris. Disinfecting helps reduce germs that may remain on surfaces after cleaning.
Before cleaning electronics, follow the manufacturer’s instructions. If no manufacturer guidance is available, follow your organization’s electronics-cleaning policy and use only products approved for electronic devices.
Preparation
Wash your hands before handling shared radios. If soap and water are not available, use an alcohol-based hand sanitizer according to your organization’s hygiene policy.
Prepare a clean work surface before cleaning multiple radios. If radios are shared across shifts, separate the workspace into two areas: one area for radios that still need to be cleaned and another area for radios that have already been cleaned.
Turn radios off before cleaning. Remove accessories only when manufacturer guidance allows it. Do not remove antennas, batteries, or accessories if doing so conflicts with the product manual or your organization’s procedure.
Cleaning
Use a clean, soft cloth to remove visible dust, dirt, or debris from the radio and accessories. If debris is trapped around buttons, grooves, or accessory areas, use a soft, non-metallic brush only if approved by the manufacturer.
Never spray liquid directly onto the radio. Apply the approved cleaning or disinfecting solution to a cloth first, then wipe the exterior surfaces carefully. Keep liquid away from speakers, microphones, buttons, battery contacts, displays, charging contacts, and accessory connectors.
Disinfecting Two-Way Radios
The CDC notes that cleaning and disinfecting are effective ways to prevent the spread of respiratory viruses (like influenza, RSV, and SARS-CoV-2) and gastrointestinal illnesses that can spread from contaminated surfaces to a user’s hands or face.
After wiping, use a clean cloth dampened with water if needed to remove residue, then dry the radio thoroughly. Do not return a radio to service or place it on a charger while it is wet. Do not use bleach, solvents, abrasive pads, or unapproved cleaning sprays unless the manufacturer explicitly approves them for the specific device and surface.
Do not use bleach, solvents, or unapproved cleaning sprays unless the manufacturer explicitly approves them for the specific device and surface.
How To Charge Two-Way Radios and Maintain Batteries
What Types of Batteries are Used in Two-Way Radios?
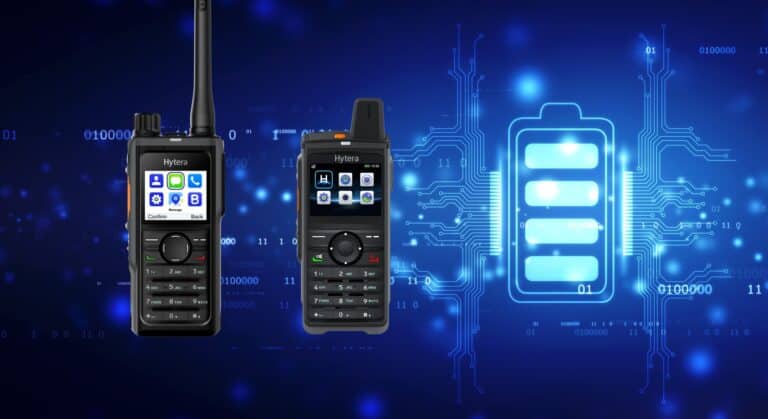
Modern professional DMR two-way radios and Push-to-Talk over Cellular radios commonly use Lithium-Ion or Lithium-Polymer rechargeable batteries. These battery types are popular because they provide strong energy-to-weight performance, allowing radios to remain portable without sacrificing useful capacity.
Lithium-Ion batteries store more energy per pound than older NiCad or NiMH battery packs, while Lithium-Polymer batteries use a polymer electrolyte and can provide higher specific energy at a lighter weight.
How Do You Charge Two-Way Radios and Extend Battery Life?
Reliable communication and extended battery life depend on proper battery charging and care. To prevent damage and ensure a full charge, turn the radio off before using any USB or dock-style charger. Maintain clean contacts and store spare batteries in a cool, dry place.
General charging guidance:
- Turn the radio off.
- Use the charger specified for the radio and battery.
- Place the radio or battery in the charger correctly.
- Confirm that the charger is connected to power.
- Keep charging contacts clean and dry.
- Do not charge wet radios or batteries.
- Do not use damaged batteries, damaged chargers, or damaged power supplies.
- Do not leave radios in hot vehicles while charging.
- Follow the manufacturer’s charging instructions for the exact model.
Some radios may support USB charging. Others may use a single-unit desktop charger, a charger with an additional battery slot, or a multi-unit charger for shared-radio environments.
For organizations with multiple radios, multi-unit chargers can help simplify end-of-shift routines. Employees can return radios to a central charging location, and supervisors can quickly see whether radios are docked and ready.
Battery life depends on how the radio is used, how often it transmits, how loud the volume is, what features are active, the age of the battery, the environment, and the charging routine.
General battery-care practices:
- Charge radios before assigning them to users.
- Use only approved batteries and chargers.
- Keep battery contacts and charger contacts clean.
- Avoid unnecessary transmissions.
- Keep messages short to reduce transmit time.
- Store batteries in a cool, dry place.
- Avoid prolonged heat exposure.
- Do not leave batteries in hot vehicles.
- Replace damaged batteries according to company procedure.
- Follow the manufacturer’s storage and charging instructions.
Frequently Asked Questions
A two-way radio is a wireless communication device that both transmits and receives voice messages. Unlike a cell phone, which typically connects two people, a two-way radio allows one user to instantly communicate with an individual or an entire group using the Push-to-Talk (PTT) button.
To use a two-way radio, turn it on, verify the battery is charged, select the correct channel or talk group, adjust the volume, listen to ensure the channel is clear, press and hold the Push-to-Talk button, pause briefly, speak clearly, release the button, and wait for a response.
Businesses use two-way radios for fast, reliable communication between employees. Common applications include coordinating security personnel, facility maintenance, construction crews, manufacturing operations, hospitality staff, warehouse workers, transportation fleets, schools, healthcare facilities, and event teams.
Push-to-Talk (PTT) is the communication method used by two-way radios. Pressing and holding the PTT button transmits your voice to other users. Releasing the button returns the radio to listening mode so others can respond.
A channel is a programmed communication path that connects users. A talk group is a group of users who communicate together on a specific channel. A zone is a collection of related channels that helps organize larger radio systems by department, building, location, or job function.
Good radio communication starts with listening before transmitting, keeping messages brief, identifying yourself and the person you are calling, speaking clearly, using the correct channel or talk group, and confirming important information. Consistent procedures help reduce missed messages and improve team coordination.
Proper maintenance includes keeping the radio clean, using approved accessories, storing it in a cool, dry location, charging the battery correctly, inspecting it for damage, and following the manufacturer’s recommendations for cleaning, storage, and battery care. Regular maintenance helps maximize reliability and service life.
This guide provides an overview of professional radio operation, but many topics deserve a deeper explanation. For detailed guidance, explore our articles on radio communication best practices, channels and zones, radio terminology, the phonetic alphabet, 10-codes, cleaning and disinfecting radios, battery charging, and radio maintenance.